Xamarin.Forms リストビュー
1 グループ表示
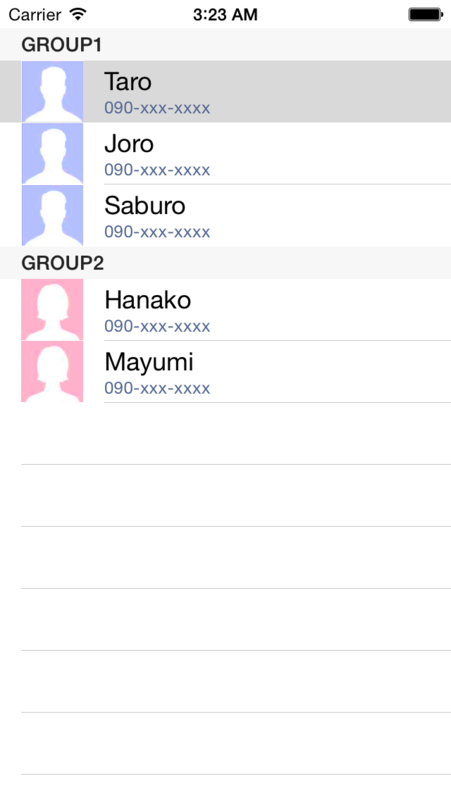


ListViewは、グループ化して表示することが可能です。
グループ化するためには、プロパティIsGroupingEnabled にtrueをセットし、ItemsSourceに「配列の配列」を指定します。
「配列の配列」は、ObservableCollection
//1つのデータを表現するクラス
class Address {
    public string Name { get; set; }//名前
    public string Phone { get; set; }//電話番号
    public string Photo { get; set; }//画像
}

//1つのグループを表現するクラス
class Group : ObservableCollection<Address>{
    public string Title { get; set; }//グループ用のタイトル
    public Group (string title){
        Title = title;
    }
}

public class App {
    public static Page GetMainPage(){

       //リストビューの生成
       var listView = new ListView {
           IsGroupingEnabled = true,//グループ表示有効
           GroupDisplayBinding = new Binding("Title"),//グループのタイトル指定
       };

       //テンプレートの作成(ImageCell使用)
       var cell = new DataTemplate(typeof(ImageCell));
       cell.SetBinding(ImageCell.TextProperty, "Name");//上段のテキスト
       cell.SetBinding(ImageCell.DetailProperty, "Phone");//下段のテキスト
       cell.SetBinding(ImageCell.ImageSourceProperty, "Photo");//画像
       cell.SetValue(ImageCell.StyleProperty, TextCellStyle.Vertical);//縦配置
       listView.ItemTemplate = cell;//テンプレート指定

       //データの作成
       var ar = new List<Group>{
           new Group("GROUP1"){
               new Address{ Name="Taro", Phone = "090-xxx-xxxx",Photo="man.png"},
               new Address{ Name="Joro", Phone = "090-xxx-xxxx",Photo="man.png"},
               new Address{ Name="Saburo", Phone = "090-xxx-xxxx",Photo="man.png"}
           },
           new Group("GROUP2"){
               new Address{ Name="Hanako", Phone = "090-xxx-xxxx",Photo="woman.png"},
               new Address{ Name="Mayumi", Phone = "090-xxx-xxxx",Photo="woman.png"},
           }
       };
       listView.ItemsSource = ar;//データ指定

       return new ContentPage {
           Padding = new Thickness(0, Device.OnPlatform(20, 0, 0), 0, 0),
           Content = listView
       };
   }
}
行の高さ指定
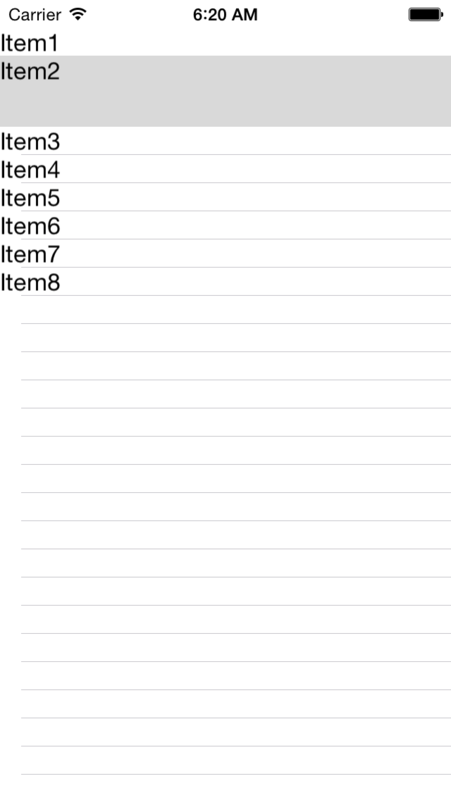


プロパティRowHeightで、行の高さを指定できます。
また、プロパティHasUnevenRowsにtrueをセットすると、行ごとに高さを変えることができます。(HasUnevenRows=trueの場合、RowHeightは無効)
この際、各行の高さは、データテンプレートのOnBindingContextChangedをオーバーライドして指定します。
サンプルは、2行目だけの行の高さを変えたのものです。(2014.08.02現在、iOSでは、正常に動作していません)
[2014.08.06 追記] Xamarin.Forms 1.2.2.6243 でiOSでも正常動作することを確認しました。
class Data {
    public string Text{ get; set; }
}

public class App {
    public static Page GetMainPage(){
        //リストビューの生成
        var listView = new ListView();
        //行の高さを可変にする
        listView.HasUnevenRows = true;
        //データの作成
        var ar = new List<Data>{
            new Data{Text="Item1"},
            new Data{Text="Item2"},
            new Data{Text="Item3"},
            new Data{Text="Item4"},
            new Data{Text="Item5"},
            new Data{Text="Item6"},
            new Data{Text="Item7"},
            new Data{Text="Item8"}
        };
        listView.ItemsSource = ar;//データ指定
        listView.ItemTemplate = new DataTemplate(typeof (MyCell));//テンプレート指定
        return new ContentPage {
            Padding = new Thickness(0, Device.OnPlatform(20, 0, 0), 0, 0),
            Content = listView
        };
    }
}

public class MyCell : ViewCell {
    public MyCell(){
        var text = new Label();
        text.SetBinding(Label.TextProperty, "Text");
        View = text;
    }
    protected override void OnBindingContextChanged(){
        base.OnBindingContextChanged();
        Height = 20;//列の高さ(デフォルト値)
        if (((Data)BindingContext).Text == "Item2") {
            Height = 50;//2行目だけ、列の高さを変更する
        }
    }
}