Xamarin.iOS ナビゲーションコントローラ
1 プッシュとポップ
(1) ナビゲーションコントローラの生成

アプリの起動時に最初に表示されるビューは、UIWindowのRootViewControllerにセットされたものですが、ここに、ナビゲーションビューを設定します。
すると、図のように、表示ビューを持たないナビゲーションバーだけのアプリが作成されます。
[Register("AppDelegate")]
public partial class AppDelegate : UIApplicationDelegate {
    UIWindow window;
    public override bool FinishedLaunching(UIApplication app, NSDictionary options) {
        window = new UIWindow(UIScreen.MainScreen.Bounds);
        //ナビゲーションコントローラの生成
        var navigationController = new UINavigationController();
        //ナビゲーションコントローラをRootViewControllerに設定
        window.RootViewController = navigationController;
        //windowをのキー画面に設定し表示状態にする
        window.MakeKeyAndVisible();

        return true;
    }
}
(2) プッシュとポップ


UINavigationControllerのメソッドである、PushViewController()と、PopViewControllerAnimated()でビューのプッシュとポップができます。
ナビゲーションコントローラに最初にプッシュされたビューがメインビューとなります
public override bool FinishedLaunching(UIApplication app, NSDictionary options) {
    window = new UIWindow(UIScreen.MainScreen.Bounds);
    var navigationController = new UINavigationController();
    window.RootViewController = navigationController;
    window.MakeKeyAndVisible();

    //FirstViewを生成してプッシュする(これがメインのビューとなる)
    navigationController.PushViewController(new FirstView(),true);

    return true;
}
例として、2つのビュー(FirstView及びSecondView)を定義します。
FirstViewには、次のビュー(SecondView)をプッシュするボタン「goto Second」が、また、SecondViewには、元に戻るための「Back」ボタンがあります。
なお、プッシュされているビューの中では、NavigationControllerプロパティで親であるナビゲーションコントローラにアクセスできます。
-- FirstView.cs --
internal class FirstView : UIViewController{
    public override void ViewDidLoad(){
        base.ViewDidLoad();

        View.Frame = UIScreen.MainScreen.Bounds;
        View.BackgroundColor = UIColor.Yellow;//分かりやすいように黄色にする
        View.AutoresizingMask = UIViewAutoresizing.FlexibleWidth | UIViewAutoresizing.FlexibleHeight;

        Title = "First";

        //「Goto Second View」ボタンの生成
        var button = new UIButton(UIButtonType.RoundedRect){
            Bounds = new RectangleF(0, 0, 200, 30),
            Center = new PointF(View.Bounds.Width/2, View.Bounds.Height/2), //画面中央
        };
        //ボタンのタイトル
        button.SetTitle("goto Second", UIControlState.Normal);

        //ボタンを押した時のイベント処理(SecondViewをプッシュする)
        button.TouchUpInside += (s, e) => NavigationController.PushViewController(new SecondView(), true);

        Add(button); //ビューへの追加
    }
}
-- SecondView.cs --
internal class SecondView : UIViewController{
    public override void ViewDidLoad(){
        base.ViewDidLoad();

        View.Frame = UIScreen.MainScreen.Bounds;
        View.BackgroundColor = UIColor.Orange;//分かりやすいようにオレンジ色にする
        View.AutoresizingMask = UIViewAutoresizing.FlexibleWidth | UIViewAutoresizing.FlexibleHeight;

        Title = "Second";

        //「Goto Second View」ボタンの生成
        var button = new UIButton(UIButtonType.RoundedRect){
            Bounds = new RectangleF(0, 0, 200, 30),
            Center = new PointF(View.Bounds.Width/2, View.Bounds.Height/2), //画面中央
        };
        button.SetTitle("Back (goto First)", UIControlState.Normal);

        //ボタンを押した時のイベント処理(ビューをポップする)
        button.TouchUpInside += (s, e) => NavigationController.PopViewControllerAnimated(true);

        Add(button); //ビューへの追加
    }
}
(3) コンストラクタでのメインビューの設定
ナビゲーションコントローラのコンストラクタでメインビューを設定することも可能です。var navigationController = new UINavigationController(new FirstView());
2 ストーリボードによる方法
プロジェクトは、「ファイル」-「新規作成」ー「新しいプロジェクト」ー「テンプレート」-「Vieual C#」- 「iOS」-「iPhone Storybord」-「Single View Application」から作成します。
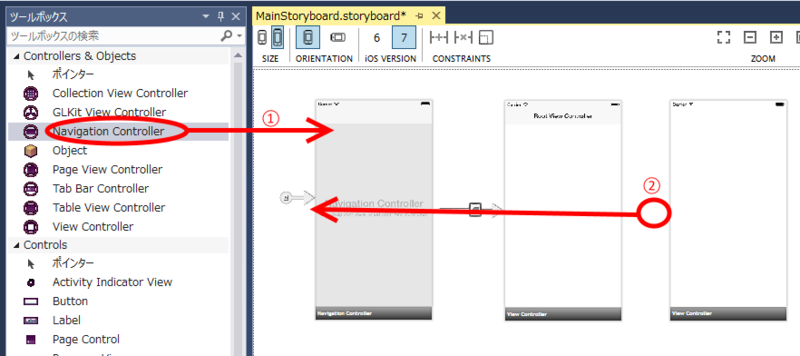
Navigation Controllerを追加 (①) し、開始を示すセグエを追加したNavigation Controllerに移動 (②) します。
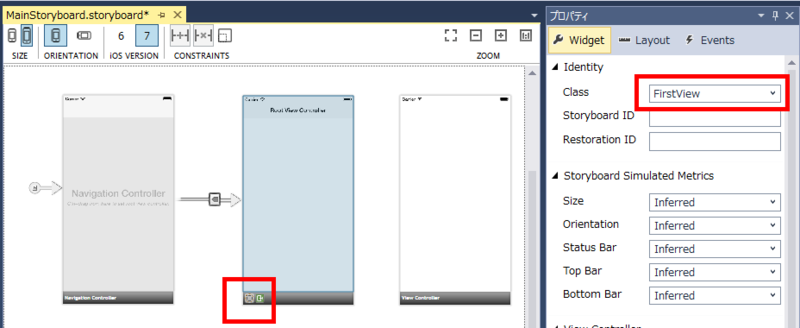
メインのビューコントローラのクラス名をFirseViewに設定します。
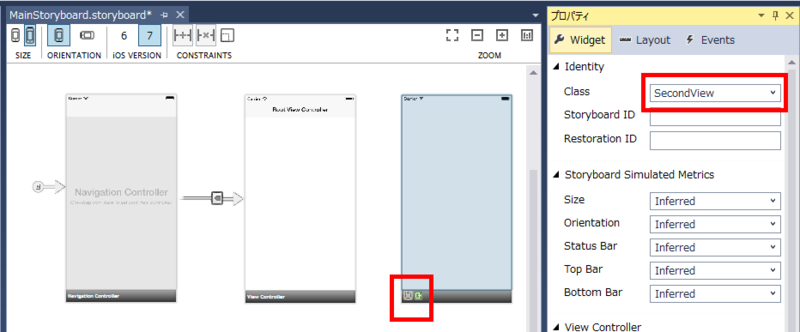
次のビューコントローラのクラス名をSecondViewに設定します。
これは、プロジェクト生成時に「SingleView1ViewController」となっていたものを修正しました。
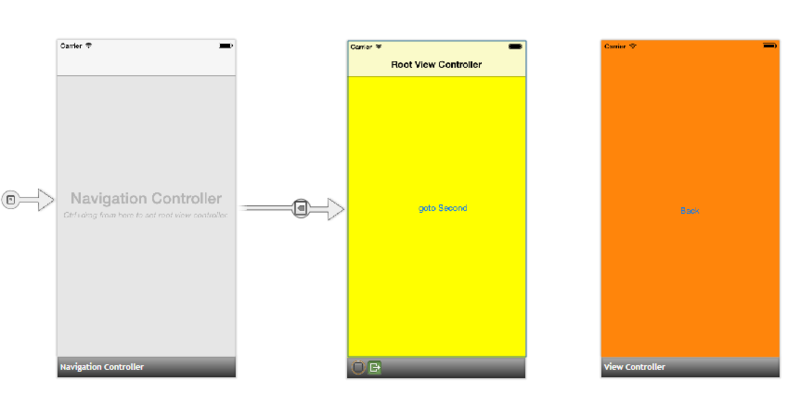
2つのビューに色とボタンを設定します
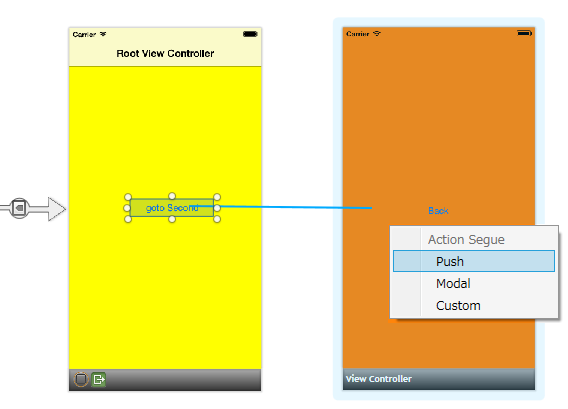
FirstView上のボタンをコントロールキーを押しながらSecondViewにドラッグ&ドロップし、ポップアップメニューで「Push」を選択します。
この操作で、ビューのプッシュが設定完了となります。
ポップの方は、ボタン押下のイベントにPopViewControllerAnimated()を記述します。
partial class SecondView : UIViewController{
    public override void ViewDidLoad(){
	base.ViewDidLoad();

        buttonBack.TouchUpInside += (s, a) => {
	    NavigationController.PopViewControllerAnimated(true);
	};
   }
}
3 階層を超えたポップ
ポップ用のメソッドは、PopViewControllerAnimatedの他に、以下のものがあります。PopToViewController() 任意のビューに移動
PopToRootViewController() ルートビューに移動
なお、特定のビューに移動する際は、NavigationControllerのプロパティ「ViewControllers」で現在プッシュされている各ビューにアクセスが可能です。
//特定のビュー(スタック上の1番目)に移動する
NavigationController.PopToViewController(NavigationController.ViewControllers[1],true);